Create a history toplist
We'll be using three fictitious trades (http://www.yourtrade1.com/, http://www.yourtrade2.com/ and http://www.yourtrade1.com/) for the purpose of this tutorial. If your database is empty at this stage, add three of your trades. If your database includes more than three trades, your results will differ from ours.
1. Create a toplist template
If you want a history toplist use the same tags as you use for the last 24h toplist, but add h_ in front of the tags. Last 24h tag for “incoming raws” looks like this: ##raw:x##, while history tag for “incoming raws” looks like this: ##h_raw:x##.
Of course you should only add h_ in front of the tags where it makes sense. You can't add h_ in front of the tags such as: return_url, domain, nick, email, icq…
TE3 template tags allow you to create completely unique toplists, but for the purpose of this tutorial use the example template we've prepared below:
<table border="1" style="width:700px">

<tr>
  <th>Domain</th>
  <th>Raw</th>
  <th>Value</th>
</tr>
<tr>
  <td><a href="/te3/out.php?id=##domain:1##">##name:1##</a></td>
  <td>##h_raw:1##</td>
  <td>##h_value:1##</td>
</tr>
<tr>
  <td><a href="/te3/out.php?id=##domain:2##">##name:2##</a></td>
  <td>##h_raw:2##</td>
  <td>##h_value:2##</td>
</tr>
<tr>
  <td><a href="/te3/out.php?id=##domain:3##">##name:3##</a></td>
  <td>##h_raw:3##</td>
  <td>##h_value:3##</td>
</tr>

</body>
2. Add new toplist
Once you have created a toplist template, you have to add it to yor TE3.
Step by step
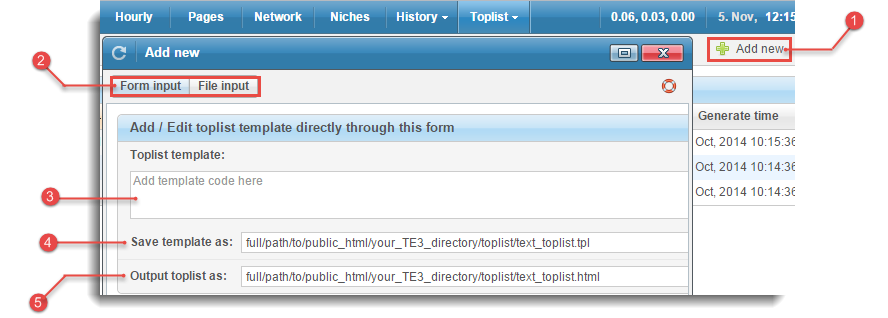
 Open “Add new” window
Navigate to the Toplist / Templates menu, click on the 
Add new button and open “Add new” pop-up window.
 Select input method
You can choose between two different input methods, we'll test “Form input” method in this tutorial.
 Add toplist template
Now you have to add a toplist template into the textarea (if you use “File input” method, it is assumed, you have already uploaded your template at this stage). Copy-paste the example template we've prepared above.
 Save template as
Specify where would you like to save your template e.g., /full/path/to/public_html/your_TE3_directory/toplist/something.tpl
(this is a toplist file with template tags)
 Output toplist as
Next, you have to enter File output path, e.g., /full/path/to/public_html/your_TE3_directory/toplist/something.html
(this is an output file - template tags get replaced with real values)
 Save toplist
Click  button in the bottom right corner.
3. Preview and edit the toplist
The new toplist is already added to the “Existing” table.

Close “Add new” window and click  icon to see the
 Preview of what the toplist will look like. Ours looks like this:

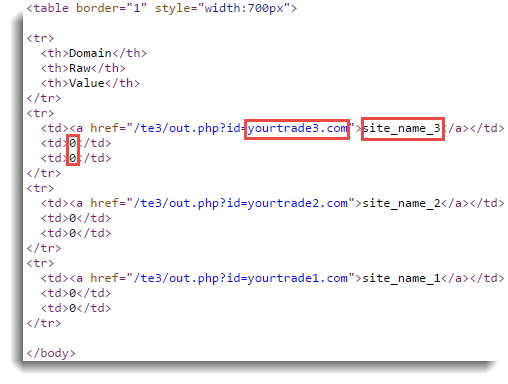
Take a look at html source for our output - you can see that TE3 template tags were replaced with real values:
You can easily edit your toplist and test its output - click ![]()
Edit icon for the respective toplist, then your changes, and click to Preview the toplist again.
4. Include toplist into your web page
After you have created and added a toplist, it has to be included into your web page!
Related topics
- Toplist templates - view toplist template syntax, learn how to add and manage toplists